
728x90
0.만들 엔드포인트
우선 Product 관련 엔드포인트는 다음과같이 5개를 우선적으로 추가할것이다.
위 2개는 사용자들을 위한 API엔드포인트고 추가,수정,삭제의 경우에는 우선은 관리자 권한으로 접근 가능하다고 생각하며 만들것이다.
| HTTP 메서드 | 엔드포인트 | 설명 |
|---|---|---|
GET |
/api/products/{productId} |
상품 상세 조회 |
GET |
/api/products/search |
상품 목록 검색 |
POST |
/api/products/create |
상품 추가 (관리자) |
PUT |
/api/products/modify/{productId} |
상품 수정 (관리자) |
DELETE |
/api/products/delete/{productId} |
상품 삭제 (관리자) |
1. Controller 스켈레톤 코드
내부 비지니스 코드를 제작하기 이전에 컨트롤러에 스켈레톤 코드로 엔드포인트를 제작해보았다.
//TODO:상품 상세조회
@GetMapping("/{productId}")
public ProductDTO getProductItemDetail(@PathVariable Long productId){
    return null;
}

//TODO:상품 목록 검색
@GetMapping("/search")
public List<ProductDTO> searchProducts(
    @RequestParam(required = false) String keyword,
    @RequestParam(required = false) String category,
    @RequestParam(required = false) Double minPrice,
    @RequestParam(required = false) Double maxPrice,
    @RequestParam(defaultValue = "0") int page,
    @RequestParam(defaultValue = "10") int count
) {

    return null;
}


//----DTO는 ProductDTO 아님 임의로 넣어둔거임
//TODO: 관리자 상품추가
@PostMapping("/create")
public ResponseEntity<Void> createProduct(@RequestBody ProductDTO productDTO) {
    return ResponseEntity.status(200).build();
}


//TODO: 관리자 상품수정
@PutMapping("/modify/{productId}")
public ResponseEntity<Void> modifyProduct(@PathVariable Long productId, @RequestBody ProductDTO productDTO) {
    return ResponseEntity.status(200).build();
}

//TODO: 관리자 상품제거
@DeleteMapping("/delete/{productId}")
public ResponseEntity<Void> deleteProduct(@PathVariable Long productId) {
    return ResponseEntity.status(200).build();
}
Swagger-UI를 통해 엔드포인트가 정상적으로 매핑된것 또한 확인하였고 이제 본격적으로 내부 로직을 설계할것이다.

2.상품 생성 엔드포인트 제작
2-1.DTO
DTO는 각각 Request , Response 2가지 정류로 만들었다. 우선 상품 제작DTO로
toEntity 메소드를 포함해서 쉽게 DTO에서 엔티티로 변경가능하게 하였다.
public class ProductCreateRequestDTO {
    private String name;

    private String image;

    private String description;

    private int price;

    private int stock;

    private Long sellerId;

    private Product.Category category;

    public Product toEntity(Seller seller) {
        return Product.builder()
            .name(this.name)
            .image(this.image)
            .description(this.description)
            .price(this.price)
            .stock(this.stock)
            .category(this.category)
            .seller(seller)
            .build();
    }
}
다음은 ResponseDTO로 fromEntity 메소드를 포함하여 ProductEntity를 DTO로 빠르게 변환할수있다.
public class ProductResponseDTO {
    private Long id;

    private String name;

    private String image;

    private String description;

    private int price;

    private int stock;

    private String sellerName;

    private Product.Category category;

    public static ProductResponseDTO fromEntity(Product product) {
        return ProductResponseDTO.builder()
            .id(product.getId())
            .name(product.getName())
            .image(product.getImage())
            .description(product.getDescription())
            .price(product.getPrice())
            .stock(product.getStock())
            .category(product.getCategory())
            .sellerName(product.getSeller().getMember().getNickname())
            .build();
    }
}
2-2.ProductController
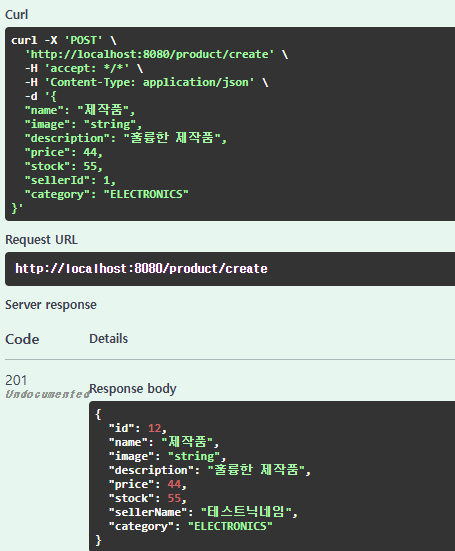
product/create 엔드포인트의 컨트롤러를 제작하였다. 제작이 성공적으로 되면 201 Created 를 응답하고 바디로 responseDTO를 보내준다.
//판매자 상품추가
@PostMapping("/create")
public ResponseEntity<ProductResponseDTO> createProduct(@Valid @RequestBody ProductCreateRequestDTO productCreateRequestDTO) {
    Product product = productService.createProduct(productCreateRequestDTO);
    ProductResponseDTO responseDTO = ProductResponseDTO.fromEntity(product);
    return ResponseEntity.status(HttpStatus.CREATED).body(responseDTO); // 201 CREATED
}

//판매자 상품수정
@PutMapping("/update/{productId}")
public ResponseEntity<ProductResponseDTO> updateProduct(@PathVariable Long productId, @RequestBody ProductUpdateRequestDto productResponseDTO) {
    Product product = productService.updateProduct(productId,productResponseDTO);
    ProductResponseDTO responseDTO = ProductResponseDTO.fromEntity(product);
    return ResponseEntity.status(HttpStatus.OK).body(responseDTO);
}

//상품제거
@DeleteMapping("/delete/{productId}")
public ResponseEntity<Void> deleteProduct(@PathVariable Long productId) {
    productService.deleteProduct(productId);
    return ResponseEntity.noContent().build();
}
2-2-1.ResponseEntity
Spring에서 HTTP 응답을 구성하는 데 사용되는 객체로 다음과같이 응답을 제어할수있다.
// 201 Created 응답 + 데이터 반환
ResponseEntity.status(HttpStatus.CREATED)
              .body(new ProductDTO(product));

// 404 Not Found 응답 (데이터 없음)
ResponseEntity.status(HttpStatus.NOT_FOUND)
              .body("상품을 찾을 수 없습니다.");

// 500 Internal Server Error 응답 + 에러 메시지
ResponseEntity.status(HttpStatus.INTERNAL_SERVER_ERROR)
              .body("서버 에러 발생");

// 200 OK 응답 + 데이터 반환
ResponseEntity.ok(new ProductDTO(product));

// 204 No Content 응답 (바디 없이)
ResponseEntity.noContent().build();
2-3.ProductService
이제 생성의 비즈니스 로직을 제작하였다. 이때 예외처리를 위한 로직들과 DTO를 prodcut로 변환하여 저장하고 리턴해준다.
// 생성
public Product createProduct(ProductCreateRequestDTO requestDTO) {
    Seller seller = sellerRepository.findById(requestDTO.getSellerId())
            .orElseThrow(() -> {
                String errorMessage = String.format("(sellerId: %d)", requestDTO.getSellerId());
                return new SellerNotFoundException(errorMessage);
            });
    ProductValidationUtil.validatePriceAndStock(requestDTO.getPrice(), requestDTO.getStock());
    Product product = requestDTO.toEntity(seller);
    return productRepository.save(product);
}

// 수정
public Product updateProduct(Long productId, ProductUpdateRequestDto requestDto) {
    Product product = productRepository.findById(productId)
            .orElseThrow(() -> new ProductNotFoundException(String.format("(productId: %d)", productId)));
    ProductValidationUtil.validatePriceAndStock(requestDto.getPrice(), requestDto.getStock());
    ProductUpdateUtil.updateProductFields(product, requestDto);
    return productRepository.save(product);
}

//삭제
@Transactional
public void deleteProduct(Long productId) {
    log.info("Deleting product with id: {}", productId);
    Product product = productRepository.findById(productId)
            .orElseThrow(() -> new ProductNotFoundException(String.format("(productId: %d)", productId)));
    productRepository.delete(product);
    log.info("Product with id {} deleted.", productId);
}
2-4.Util 클래스들
서비스 로직이 너무 길어져서 Util 디렉토리를 만들어서 몇가지 함수들을 분리했다.
상품 필드업데이트를 위한 클래스
public class ProductUpdateUtil {
    public static void updateProductFields(Product product, ProductUpdateRequestDto requestDto) {
        if (requestDto.getName() != null) {
            product.setName(requestDto.getName());
        }
        if (requestDto.getDescription() != null) {
            product.setDescription(requestDto.getDescription());
        }
        if (requestDto.getImage() != null) {
            product.setImage(requestDto.getImage());
        }
        if (requestDto.getCategory() != null) {
            product.setCategory(requestDto.getCategory());
        }
    }
}
상품 가격,개수 유효성검사 클래스
public class ProductValidationUtil {
    public static void validatePriceAndStock(Integer price, Integer stock) {
        if (price != null && price <= 0) {
            String errorMessage = String.format("Invalid price: %d", price);
            throw new InvalidProductDataException(errorMessage);
        }
        if (stock != null && stock < 0) {
            String errorMessage = String.format("Invalid stock: %d", stock);
            throw new InvalidProductDataException(errorMessage);
        }
    }
}
2-5.테스트
Swagger를 통해 테스트 결과 성공적으로 제작하였다.
3.예외처리 GlobalExceptionHandler
@ControllerAdvice와 함께 사용하는 예외처리 클래스다.
@ControllerAdvice는 전역적인 예외 처리 및 특정 메소드에 대한 동작을 변경해준다.
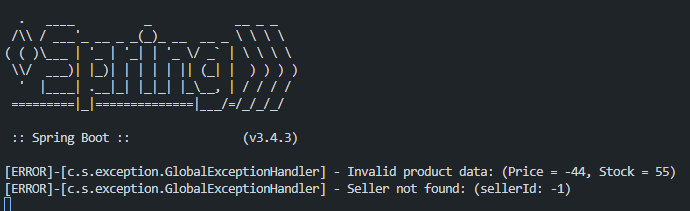
@Hidden 어노테이션은 Swagger에서 숨기기 위해서 사용한다. 내부의 InvalidProductDataException,SellerNotFoundException 예외는 따로 커스텀 예외로 선언해줬다.
로거는 slf4j의 로거를 사용하여 예외가 발생하면 로그를 발생시키게 하였다.
@Hidden
@ControllerAdvice
public class GlobalExceptionHandler {

    private static final Logger log = LoggerFactory.getLogger(GlobalExceptionHandler.class);

    // Handle SellerNotFoundException
    @ExceptionHandler(SellerNotFoundException.class)
    public ResponseEntity<String> handleSellerNotFound(SellerNotFoundException ex) {
        log.error("Seller not found: {}", ex.getMessage());
        return ResponseEntity.status(HttpStatus.NOT_FOUND).body("Seller not found: " + ex.getMessage());
    }

    // Handle InvalidProductDataException
    @ExceptionHandler(InvalidProductDataException.class)
    public ResponseEntity<String> handleInvalidProductData(InvalidProductDataException ex) {
        log.error("Invalid product data: {}", ex.getMessage());
        return ResponseEntity.status(HttpStatus.BAD_REQUEST).body("Invalid product data: " + ex.getMessage());
    }

    // Handle generic exceptions (500 Internal Server Error)
    @ExceptionHandler(Exception.class)
    public ResponseEntity<String> handleUnexpectedError(Exception ex) {
        log.error("Unexpected error: {}", ex.getMessage(), ex);
        return ResponseEntity.status(HttpStatus.INTERNAL_SERVER_ERROR).body("Unexpected error: " + ex.getMessage());
    }
}
커스텀 예외처리 2개
public class InvalidProductDataException extends RuntimeException {
    public InvalidProductDataException(String message) {
        super(message);
    }
}

public class SellerNotFoundException extends RuntimeException {
    public SellerNotFoundException(String message) {
        super(message);
    }
}
InvalidProductDataException, SellerNotFoundException예외가 발생했을때 뜨게 되는 로그다.
4. 로그 설정
/resources 디렉토리에 logback.xml 파일을 제작하여 springboot의 로그를 설정해준다.
포멧하고 로그의 레벨수준을 설정해준다.
<configuration>
    <!-- 콘솔 로그 출력 포맷을 간결하게 설정 -->
    <appender name="CONSOLE" class="ch.qos.logback.core.ConsoleAppender">
        <encoder>
            <!-- 로그 출력 포맷 설정: 시간, 로그 레벨, 메시지만 출력 -->
            <pattern>[%-5level]-[%logger{36}] - %msg%n </pattern>
        </encoder>
    </appender>

    <!-- 로그 레벨 설정 -->
    <root level="ERROR">
        <appender-ref ref="CONSOLE" />
    </root>

    <!-- 특정 패키지의 로그 레벨 설정 (예: DEBUG) -->
    <logger name="com.shopping" level="ERROR" />
</configuration>
기존 오류가 발생하면 여러가지 터미널에 길게 로그가 발생했지만 설정을 통해 Error 수준으로 제한하고 포멧을 보기 쉽게 설정해뒀다.

728x90
'BackEnd > SpringBoot' 카테고리의 다른 글
| [SpringBoot] 역할 접근권한설정, 상품 소유 인증 (0) | 2025.02.25 |
|---|---|
| [SpringBoot] JWT와 로그인,로그아웃 기능 제작 (0) | 2025.02.22 |
| [SpringBoot] 쇼핑몰 회원가입 기능 제작 (0) | 2025.02.21 |